
You don't need a complicated programme or a personal trainer. You don't need a barbell or a gym membership. What you need is a handful of exercises that target the specific things perimenopause is quietly taking from you: muscle mass, bone density, balance, core stability, and pelvic floor strength.
These 8 exercises were chosen based on research from the LIFTMOR trial, the University of Exeter menopause resistance training study, ACSM guidelines, and the UK "Strong, Steady and Straight" consensus statement on bone health [1] [2] [3]. Every one of them can be done at home with a pair of dumbbells and a sturdy chair.
The full routine takes 30-40 minutes. Do it 2-3 times per week with at least one rest day between sessions.
Before you start: a quick warm-up
Spend 5 minutes getting your body ready. This matters more during perimenopause because joints, tendons, and ligaments become more vulnerable as oestrogen declines [4].
- 2-3 minutes of marching on the spot or walking around the house. Get your heart rate up gently.
- Leg swings: Hold a wall and swing each leg forward and back 10 times, then side to side 10 times.
- Arm circles: Small circles building to large ones, 10 each direction.
- Bodyweight squats: 5-8 slow, shallow squats to warm up your hips and knees.
Exercise 1: Goblet Squat
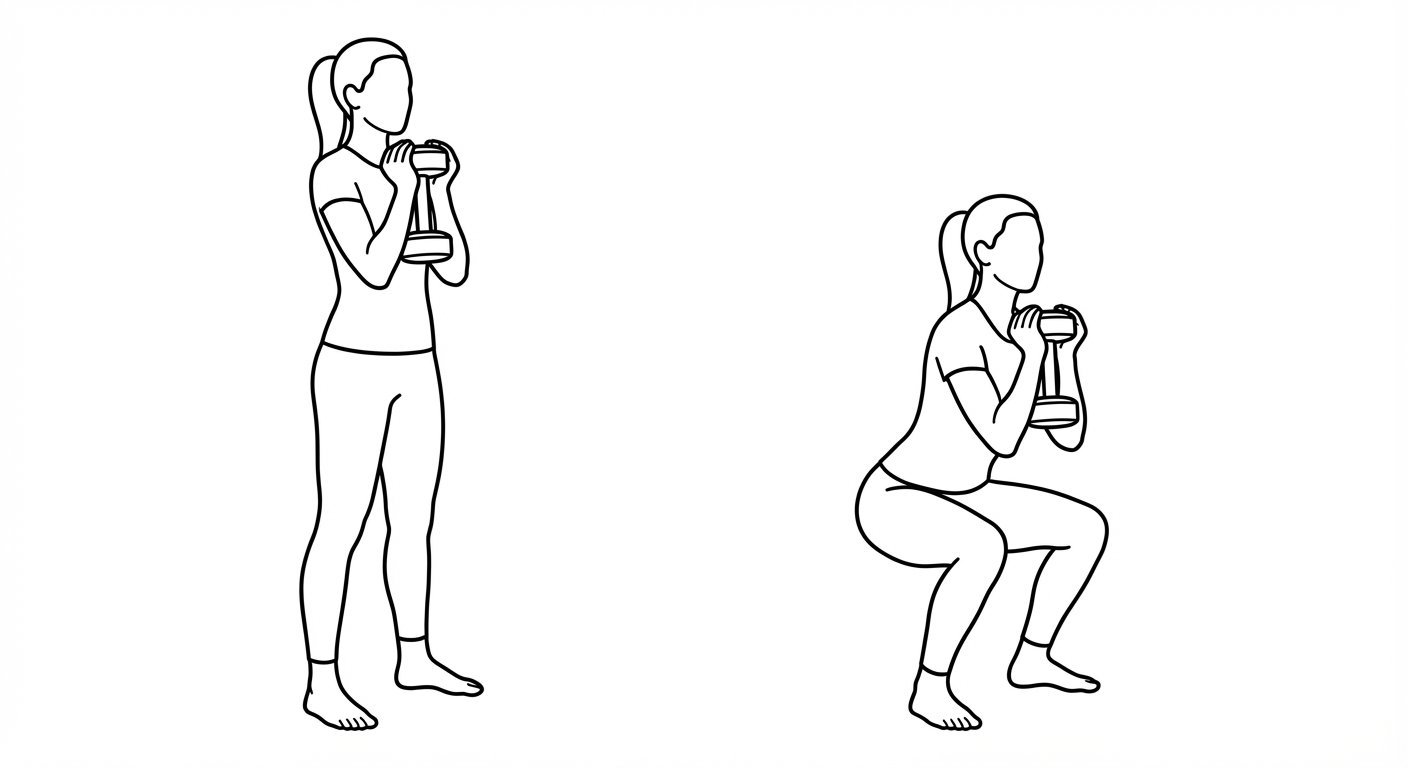
What it targets: Quads, glutes, core
Why it matters for perimenopause: Your quadriceps are among the first muscles to weaken during perimenopause because they're rich in fast-twitch fibres that are sensitive to oestrogen decline [5]. The squat also loads the hip and spine simultaneously, the two most common fracture sites after menopause [6]. Both the LIFTMOR trial and the Exeter study included squats as a core exercise.
How to do it:
- Hold a dumbbell or kettlebell at chest height with both hands, elbows tucked in. (No weight? A large water bottle works.)
- Stand with feet shoulder-width apart, toes turned out slightly.
- Push your hips back, then bend your knees to lower yourself down.
- Keep your chest up. The weight at your chest naturally prevents you from tipping forward.
- Lower until your thighs are roughly parallel to the floor, or as deep as feels comfortable.
- Press through your whole foot to stand back up. Squeeze your glutes at the top.
Starting point: Can't get to parallel? Place a chair behind you and squat down until you lightly touch the seat, then stand back up. This gives you a depth target and a safety net.
When it gets easy: Add more weight, or pause for 2 seconds at the bottom of each rep.
Do: 3 sets of 10-12 reps. Rest 60-90 seconds between sets.
Exercise 2: Romanian Deadlift
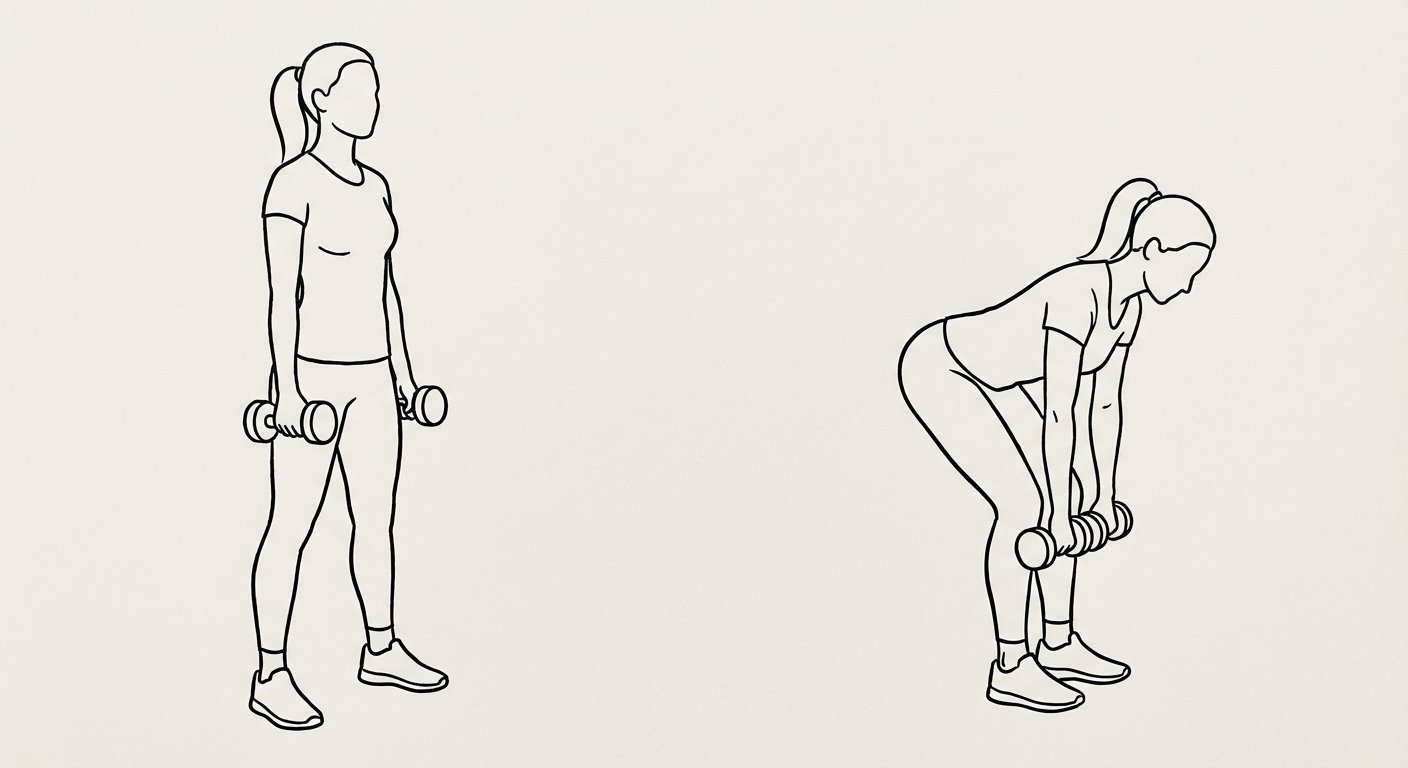
What it targets: Hamstrings, glutes, lower back
Why it matters for perimenopause: The posterior chain (the muscles running down the back of your body) is your primary defence against lower back pain, which is common during perimenopause. The hip hinge pattern was a core movement in the Exeter study, and the conventional deadlift was one of only three exercises in the LIFTMOR trial that improved lumbar spine bone density by 3% [1]. The Romanian deadlift is a more accessible version that's gentler on the lower back.
How to do it:
- Stand with feet hip-width apart, holding a dumbbell in each hand in front of your thighs.
- Soften your knees slightly and keep them there throughout.
- Push your hips straight back, like you're closing a car door with your bum.
- Let the dumbbells slide down the front of your legs, keeping them close to your body.
- Lower until you feel a stretch in your hamstrings (usually around mid-shin level).
- Keep your back flat throughout. Imagine a broomstick along your spine: your head, upper back, and tailbone should all stay in contact with it.
- Drive your hips forward to stand back up. Pause for a moment at the top to fully extend your hips.
Starting point: No dumbbells? Stand about a foot away from a wall, push your hips back until they touch the wall, then stand up. This teaches the hip hinge pattern with zero load.
When it gets easy: Increase the weight, or try it on one leg (single-leg Romanian deadlift) for a serious balance challenge.
Do: 3 sets of 10-12 reps. Rest 60-90 seconds between sets.
Exercise 3: Incline Push-Up
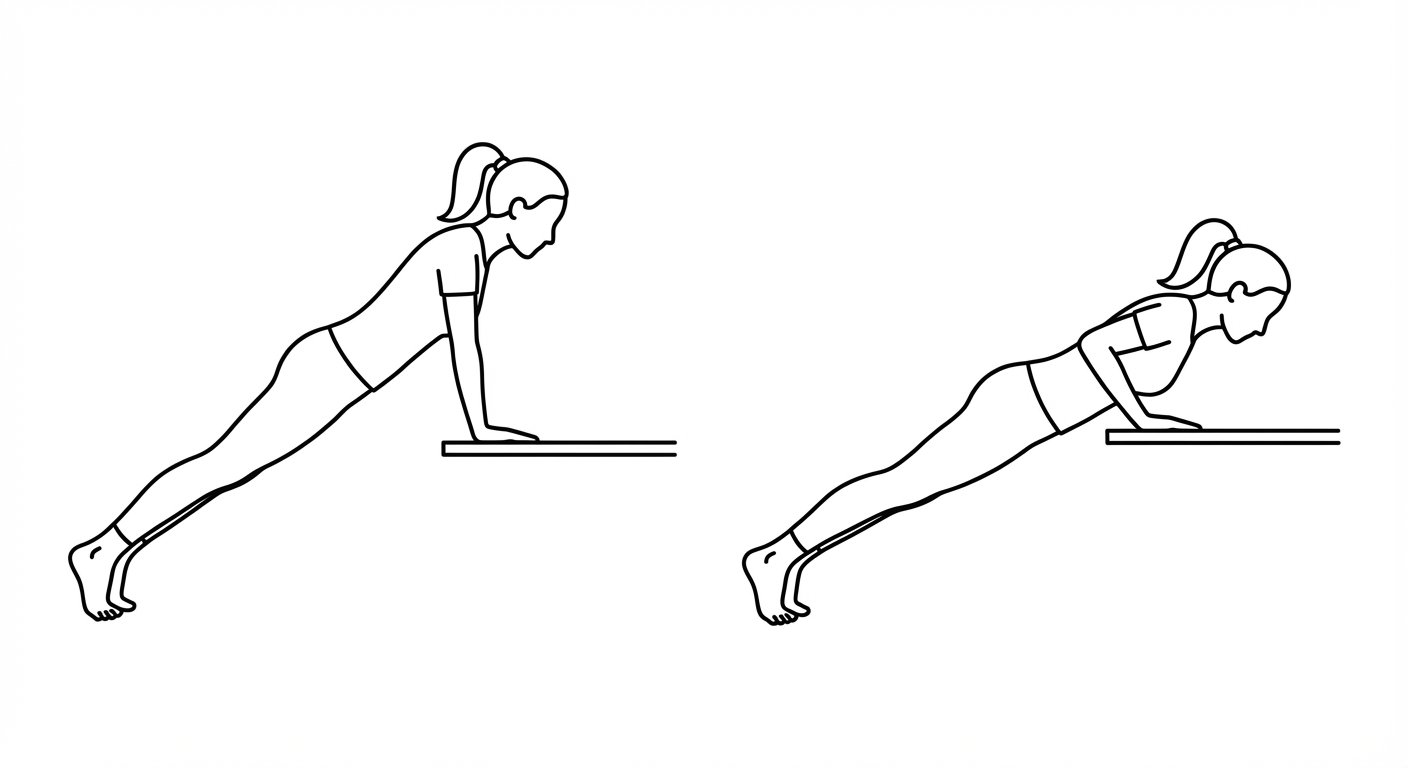
What it targets: Chest, shoulders, triceps, core, and loads the wrists
Why it matters for perimenopause: Upper body strength declines faster than lower body during perimenopause. Push-ups are also one of the few exercises that loads your wrists with bodyweight, which matters because the wrist is the third most common fracture site in osteoporosis [7]. The core demand supports spinal stability too.
How to do it:
- Place your hands on a kitchen counter, sturdy table, or the back of a sofa. The higher the surface, the easier the exercise.
- Hands slightly wider than shoulder-width, fingers spread.
- Your body should form a straight line from your head to your heels. Squeeze your glutes and brace your core.
- Lower your chest toward the surface by bending your elbows. Keep them at roughly 45 degrees from your body (not flared out wide).
- Press back up to full arm extension.
- Breathe in on the way down, out on the way up.
Starting point: Wall push-ups. Stand arm's length from a wall and push up from there. Almost no bodyweight goes through your arms, but you're still building the movement pattern and loading your wrists.
When it gets easy: Gradually lower the surface: wall, then kitchen counter, then a sturdy chair seat, then the floor on your knees, then full floor push-ups. Getting from wall to floor over 8-12 weeks is a realistic and satisfying progression.
Do: 3 sets of 8-12 reps at whatever incline lets you keep good form. When you can do 12 comfortably, lower the surface.
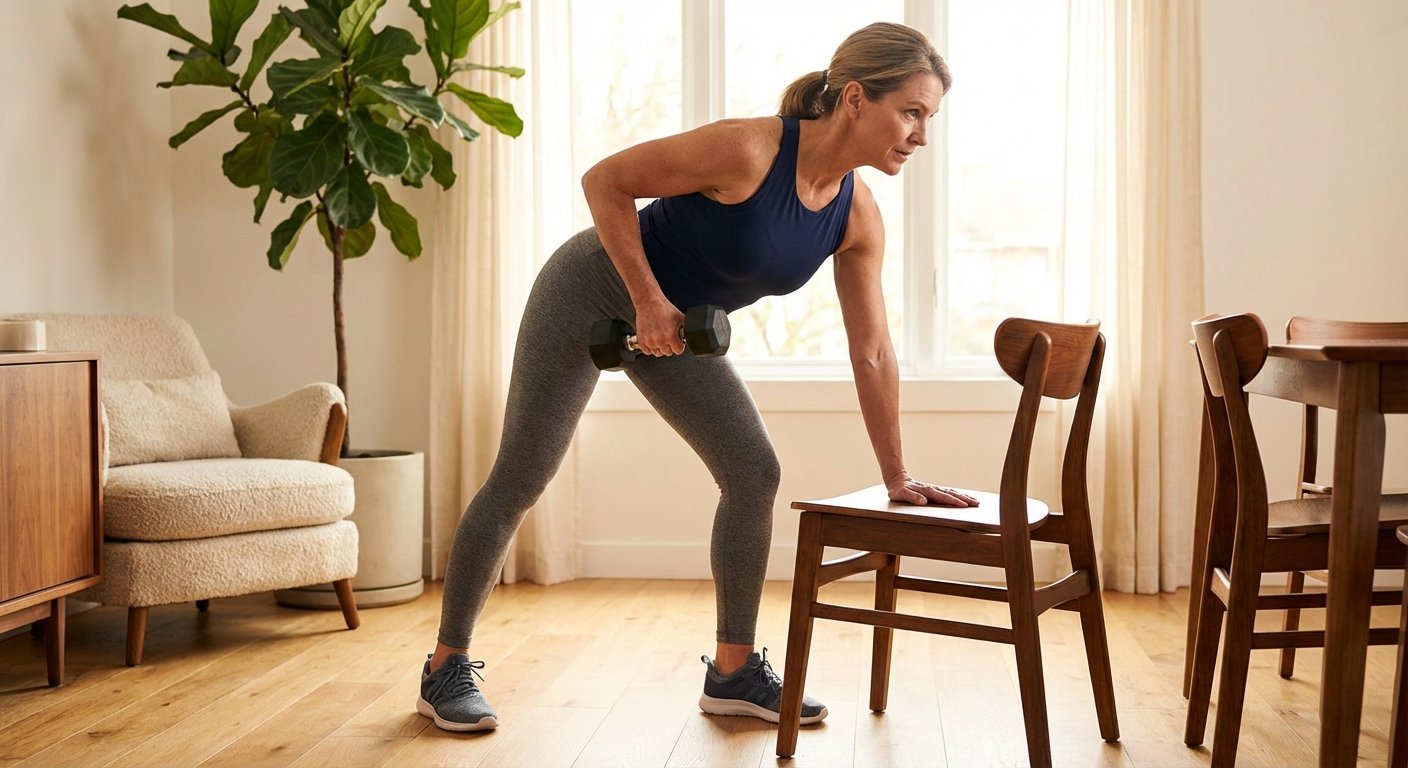
Exercise 4: Single-Arm Row
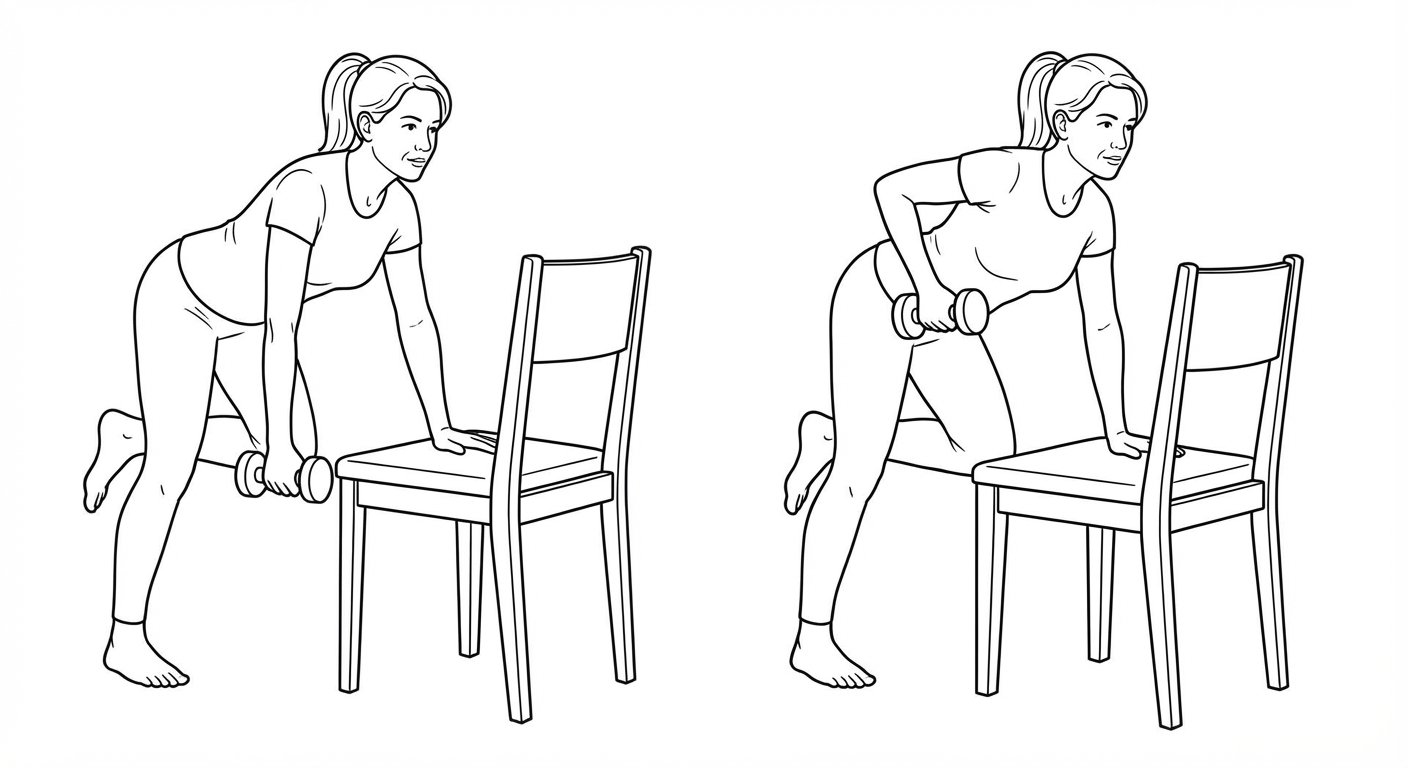
What it targets: Upper back, rear shoulders, biceps, core (anti-rotation)
Why it matters for perimenopause: Posture deteriorates with age as the upper back muscles weaken, leading to a rounded upper back (thoracic kyphosis). This is especially relevant post-menopause when spinal compression fractures become more common. The UK "Strong, Steady and Straight" consensus calls out exercises for postural correction [3]. Rowing movements counteract the forward slouch that increases vertebral fracture risk.
How to do it:
- Place your left hand and left knee on a sturdy chair or low table for support. Your back should be roughly flat, like a tabletop.
- Hold a dumbbell in your right hand, arm hanging straight down.
- Pull the dumbbell up toward your lower ribs, driving your elbow straight back (not out to the side).
- Squeeze your shoulder blade in toward your spine at the top.
- Lower with control over 2-3 seconds.
- Keep your core braced and resist the urge to twist your torso as you pull.
Starting point: Use a very light weight (1-2 kg) or a tin of beans. Focus on feeling the squeeze between your shoulder blades rather than pulling hard.
When it gets easy: Increase the weight. Or try a slow tempo: 3 seconds up, 1 second hold at the top, 3 seconds down.
Do: 3 sets of 10-12 reps per side. Rest 60 seconds between sets.
Exercise 5: Overhead Press
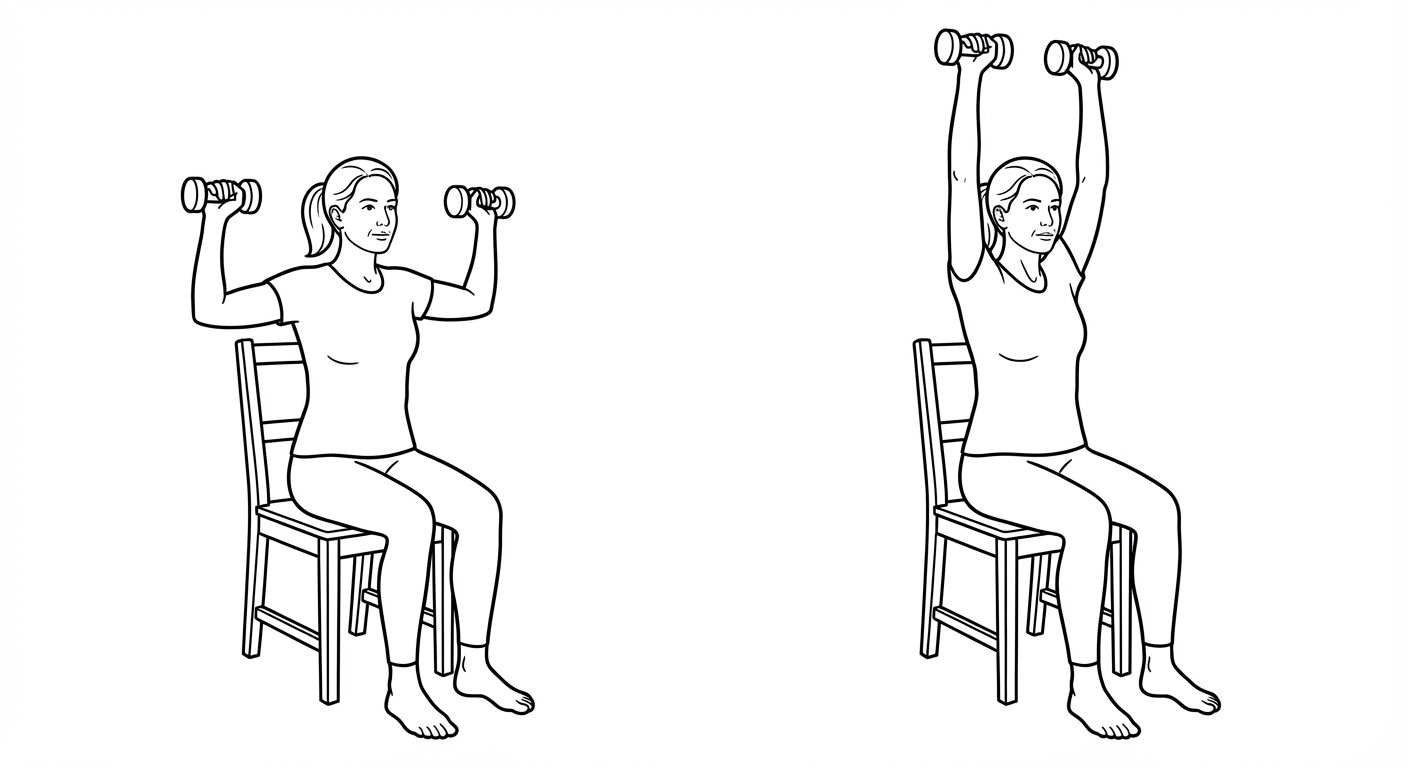
What it targets: Shoulders, triceps, core
Why it matters for perimenopause: Overhead reaching is one of the first functional movements lost with age. The ability to put things on a high shelf, reach into cupboards, or lift a bag into an overhead locker diminishes as shoulder strength and mobility decline. The LIFTMOR trial included the overhead press as one of only three resistance exercises in its protocol [1]. Pressing overhead also puts vertical load through the spine, which supports bone density.
How to do it:
- Sit on a chair with your feet flat on the floor. (Sitting removes the balance demand and prevents excessive back arching.)
- Hold a dumbbell in each hand at shoulder height, palms facing forward.
- Brace your core. Do not arch your lower back.
- Press the dumbbells straight up until your arms are fully extended, finishing above the crown of your head.
- Lower with control back to shoulder height.
- Breathe out as you press up.
Starting point: Very light dumbbells (1-2 kg) or even water bottles. If shoulder mobility is limited, press to a comfortable height rather than forcing full extension.
When it gets easy: Progress from seated to standing (adds a core stability challenge). Increase weight. Or try pressing one arm at a time, which forces your core to resist tilting sideways.
Do: 3 sets of 10-12 reps. Rest 60-90 seconds between sets.
Exercise 6: Glute Bridge
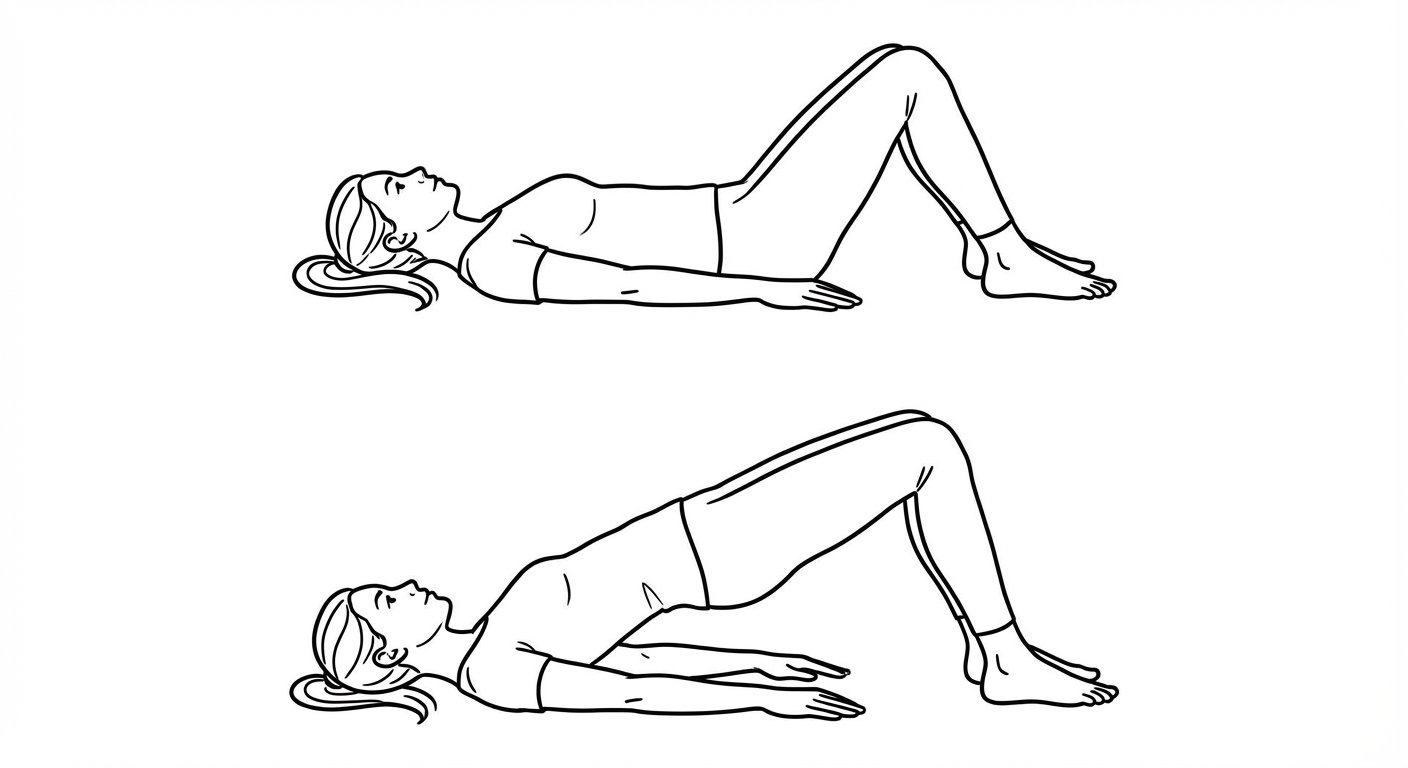
What it targets: Glutes, hamstrings, pelvic floor
Why it matters for perimenopause: Your glutes are the largest muscle group in your body and are critical for hip stability, walking, stair climbing, and getting up from a chair. But there's another reason this exercise makes the list: the pelvic floor. Pelvic floor muscles contain oestrogen receptors and weaken as oestrogen declines, contributing to urinary incontinence and pelvic organ prolapse [8]. The glutes, abdominals, and diaphragm are all fascially connected to the pelvic floor, so strengthening your glutes directly supports pelvic floor function. The glute bridge puts load through the hip too, the second most dangerous fracture site.
How to do it:
- Lie on your back with knees bent, feet flat on the floor, hip-width apart. Arms at your sides.
- Press through your heels and squeeze your glutes to lift your hips until your body forms a straight line from shoulders to knees.
- Hold at the top for 2-3 seconds. Actively squeeze.
- As you lift, gently engage your pelvic floor (think about stopping the flow of urine). This doesn't need to be a big effort, just a gentle lift.
- Lower slowly with control. Don't just drop.
- The movement comes from your hips, not your lower back. If you feel it in your back, you're pushing too far.
Starting point: Reduce the range. Just lift your hips a few inches off the ground and focus on the glute squeeze. Even a small range of motion activates the right muscles.
When it gets easy: Single-leg glute bridge (extend one leg, bridge on the other). Or place a dumbbell across your hips for added resistance. A resistance band above your knees increases glute medius activation.
Do: 3 sets of 12-15 reps. Hold the top for 2-3 seconds each rep. Rest 60 seconds between sets.
Exercise 7: Plank
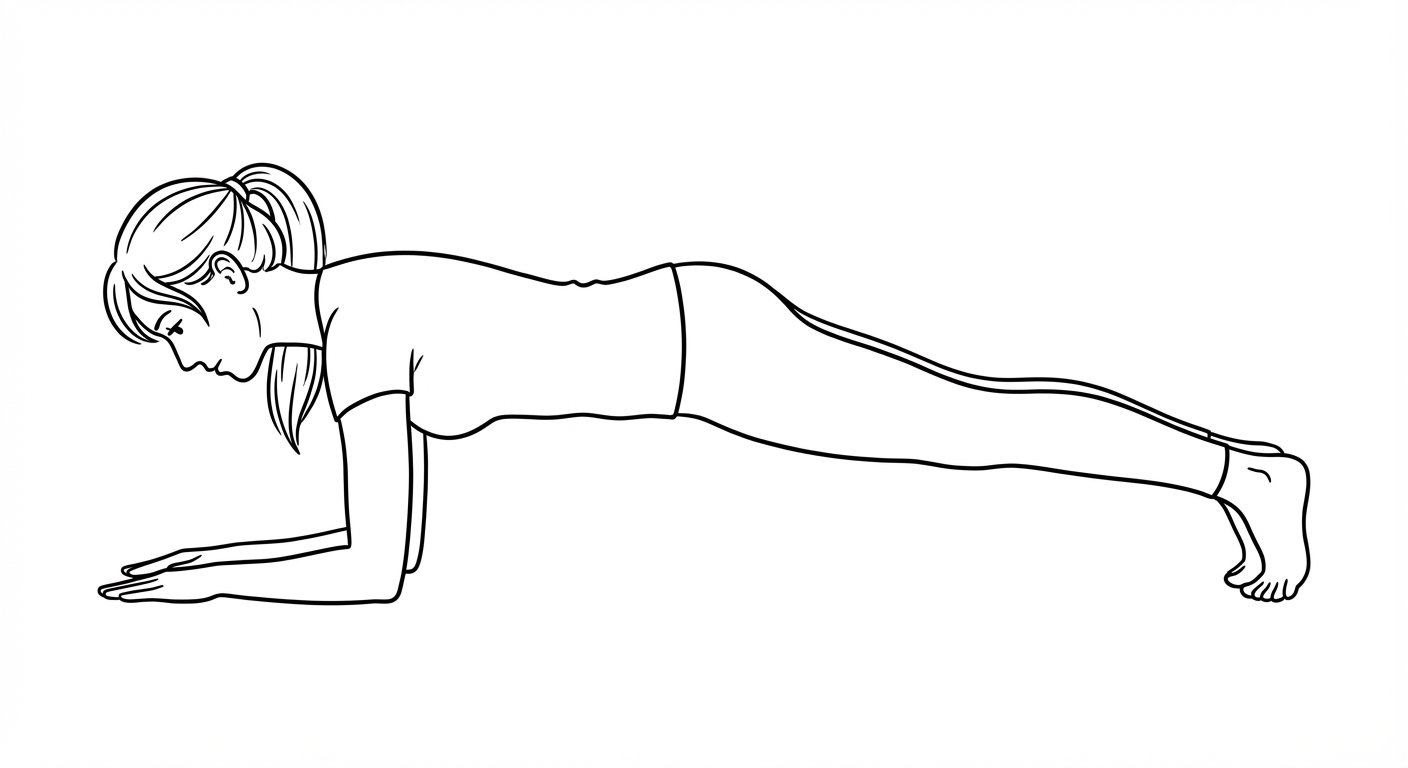
What it targets: Deep core (transverse abdominis), rectus abdominis, obliques, lower back, shoulders
Why it matters for perimenopause: Core stability is the foundation for every other exercise and for daily movement. A strong core protects the lumbar spine, which is the number one fracture site in osteoporosis. The plank builds endurance in the deep stabilising muscles without spinal flexion. This is important: traditional sit-ups and crunches compress the vertebrae, which is risky if bone density is declining [3]. The plank gets the job done without that risk. It was included in the Exeter study protocol.
How to do it:
- Forearm plank: place your forearms on the ground, elbows directly under your shoulders.
- Step your feet back until your body is flat and level, head to heels.
- Squeeze your glutes. Brace your core as if someone were about to poke you in the stomach.
- Keep your hips level. Don't let them sag toward the floor or pike up toward the ceiling.
- Breathe normally. Don't hold your breath.
- Look at the floor between your hands to keep your neck in a neutral position.
Starting point: Incline plank with your forearms on a sofa seat or a step. Or a kneeling plank (from your knees instead of your toes). Even a standing plank with forearms against a wall works for absolute beginners.
When it gets easy: Progress from incline to floor. Switch from forearms to hands (adds wrist loading for bone density). Add movement: shoulder taps, plank marches, or side plank holds.
Do: 3 holds of 20-30 seconds to start, building toward 45-60 seconds. Rest 30-60 seconds between holds. Quality matters more than duration. Stop when your form breaks.
Exercise 8: Farmer's Carry
What it targets: Grip, forearms, core (anti-lateral flexion), traps, whole-body stabilisation
Why it matters for perimenopause: Grip strength is one of the strongest predictors of longevity, and the association is even stronger in women than men. For every 5 kg decrease in grip strength, the hazard ratio for all-cause mortality is 1.49 in women [9]. Weak grip in midlife is associated with falls, disability, cardiovascular disease, and type 2 diabetes. The farmer's carry is also the most functional exercise on this list. It's carrying shopping bags. It's carrying a suitcase. It applies vertical load through your spine (bone density) while training grip, posture, and gait all at once.
How to do it:
- Hold a dumbbell or kettlebell in each hand at your sides. (Heavy bags, watering cans, or anything with a handle works.)
- Stand tall: shoulders back and down, chest up, core braced.
- Walk with normal strides for a set distance or time.
- Don't lean to one side. The weights shouldn't pull you off-centre.
- Keep your shoulders level and packed down. Don't shrug.
- Maintain upright posture throughout. Imagine balancing a book on your head.
Starting point: Go light (2-4 kg per hand) and walk for 20 seconds. The challenge should come from the weight, not the distance.
When it gets easy: Add weight. Increase distance or time. Try a suitcase carry (weight in one hand only), and your core has to work much harder to stop you leaning sideways.
Do: 3-4 walks of 20-30 metres (or 30-45 seconds). Rest 60 seconds between walks.
Putting it together
Here's how a session looks:
- Warm-up (5 min)
- Goblet Squat (3 x 10-12)
- Romanian Deadlift (3 x 10-12)
- Incline Push-Up (3 x 8-12)
- Single-Arm Row (3 x 10-12 each side)
- Overhead Press (3 x 10-12)
- Glute Bridge (3 x 12-15)
- Plank (3 x 20-60 sec)
- Farmer's Carry (3-4 x 30-45 sec)
- Cool-down stretch (5 min)
Schedule: 2-3 times per week, with at least one rest day between sessions. On off days, walking, yoga, or gentle stretching are all good options.
How to progress: When you can complete all your reps with good form and the last 2 reps don't feel challenging, increase the weight by the smallest increment available. You don't need to increase everything at once. Progress one exercise at a time.
A realistic progression: spend weeks 1-2 learning the movements with bodyweight or very light weights. Weeks 3-4, add light dumbbells. From week 5 onward, start increasing load gradually. By week 12, you'll be noticeably stronger. The Exeter study achieved exactly this in twelve weeks [2].
A note on difficult days
Some days you'll have energy for all 8 exercises. Some days you'll have energy for 4. Both are fine.
During perimenopause, your energy fluctuates in ways that don't follow a pattern. Oestrogen affects everything from sleep quality to inflammation to muscle recovery. A session where you do 5 exercises and call it is still a session. It still counts. It still builds strength.
The goal is consistency over weeks and months, not perfection on any given day.
Motion tracks every strength session and adjusts your weekly goals to match your actual capacity. Your Motmot (your digital fitness pet) doesn't care whether you did 8 exercises or 5. It cares that you showed up.
Sources
- PubMed: Watson et al. LIFTMOR Trial (2018)
- PMC: University of Exeter/Pvolve Resistance Training Study Across Menopause Stages (2024)
- PMC: Strong, Steady and Straight. UK Consensus on Physical Activity for Osteoporosis (2022)
- Climacteric: The Musculoskeletal Syndrome of Menopause (2024)
- Frontiers in Endocrinology: Sarcopenia and Menopause. The Role of Estradiol (2021)
- Bone Health and Osteoporosis Foundation: What Women Need to Know
- PMC: Osteoporosis Due to Hormone Imbalance. Fracture Risk (2022)
- PMC: Pelvic Floor Muscle Exercises for Urinary Incontinence in Postmenopausal Women. Systematic Review (2023)
- PMC: Grip Strength. An Indispensable Biomarker for Older Adults (2019)